|
|
|
What do you need to create an original horizon?
PSP6, or PSP5, you can even make do with the dated PSP4 (which as I believe can be picked up at some places for free, but don’t ask me where). I have done some work on horizons with Micrografx 6, but found that I much prefer PSP, as apparently most people do. Some good quality photos. A scanner.
Perhaps you might think that you could find some good pics for your horizon on the Internet. Well, take my word for it and save yourself a lot of time and frustration: unless they are of an exceptional quality (probably at least 300 kb in size), you can just as well forget about it. Practically no one would publish such pics, they take far too much space and load too slow. Maybe with the advent of cable modems this could change, but not in a hurry. Most of the stuff that gets published is far too small for this purpose, and your horizon is going to be only as good as you “prima materia” will allow it to be.
So here is my first advise - take your own photographs, with the purpose in mind of using them for your art work. The best way is to go to some high ground with a good view on a clear day, and take a series of snapshots moving your camera in the circle as far as you can go. There aren’t many places that would allow you a 360 degree view, so you might have to fill in some bits later. I use a Minolta, nothing flashy, just a solid middle range camera.
Perhaps a word or two will be in place here about digital cameras. Unless you have one of an exceptional quality or are prepared to spend at least $2000, forget about it. Or maybe wait a couple of years, until digital camera technology catches up with the classical cameras. At the moment you still get a better quality pics with the classical cameras, at less cost.
If you can’t take your own snapshots, the alternative might be using some good reproductions, but here you need to be careful about the copyrights. If you use your own snapshots you’ll never have any problems. Practically all my horizons have come from my own snapshots, some of them many years old, taken long before I even dreamed of designing cyber golf courses. This proves that horizons can be assembled from almost any material, provided that you posses enough resourcefulness and imagination, so that you can make the various bits and pieces work together. It is also a lot of fun - personally I find making the horizon perhaps the most enjoyable part of the whole designing process.
After you’ve decided on what you are going to use - only in a rough way, you’re almost certainly going to change your mind about some pics that originally looked a certainty - next comes the scanning. I use an old KFX scanner that probably wouldn’t fetch 20 bucks second hand, but I still get decent results from scanning ordinarily sized prints as they come from the lab. The key, I think, is to scan in a fairly high resolution. I normally use the resolution of 600 (sometimes 300) pixels per inch to scan an average sized print. This results in a huge image (you need a fair bit of hard disk space to process it), which I immediately resize down to about the width of my largest panel (1024 pixels). In PSP I then usually go Image/Sharpen/Sharpen. I immediately save the image in a special folder in .jpg format. That way, if I stuff up anywhere along the line, I can always start afresh. Also, I can always exit the program if I get a low memory message, which might happen if you don’t have a lot of space on your hard drive. If I know exactly what I’m after in designing the horizon (sometimes I don’t and I simply let things happen), I would end up with about 10 - 12 images in the folder. When I’m groping a bit, there would be more, perhaps 20 - 30. Barely a third of this material would end up to be the part of the new horizon, but a lot might come useful in future.
There is usually a pick that somehow offers itself as your “key image”, something that you feel should be the feature of your future horizon. When I have made that decision I build the horizon around that particular feature. Ideally, the best horizons should have several lesser features as well, so that there are no “dull” views in any shot on the course. My designing philosophy is to always give the cyber golfer something to look at from any angle - an attractive rock formation, a distant island, an interesting building, or at least a nice group of trees.
For your horizon you need 21 panels in all, ie. seven panels in three different resolutions. Their width is set at 1024, 800, 640 pixels. In practice this means that you have to assemble seven panels in the largest resolution required (1024), these are eventually going to be resized to give you the smaller sizes. The height of the panels is up to you, it could be anything, up to 400 pixels. Naturally, you don’t want to go that high, because there would not be any space left for the sky. If I go for a horizon with very tall mountains (such as in my Bohemian Forest GBC version), I would probably make the height at least 300 pixels - BF was 350, which still left 50 pixels of sky above the highest peak. My average is about 300, the horizon I’m currently working on, for the GBC version of Australian Links, is 260 pixels tall, it has the sea on one side and some average sized mountains on the other. But you’re not facing any vital decision at this point, you can always scale up or down at any stage of the process, all you need to do is copy the original and paste it into a new panel.
OK, let’s say that you have chosen 300 pixels to be the height of your panels, the immediate task therefore is to make seven panels of 1024 x 300 pixels. Go to File/new and on the New Image menu that pops up set the parameters at that. I choose white for background color at this stage, Image Type 16.7 million colors. Don’t forget the Resolution - set it at the number you used while scanning your pictures, in our sample case at 600.
Now the real creative process can begin. You are like some Divine agency at work, at least that’s how I often feel. Even if you are recreating a real course using snapshots taken in the very place, you’ll still need a lot of creativity and imagination in filling in the blind spots, etc. Unless you real course has a peak somewhere in the middle that would allow you the 360 degree view, you’ll need to do some, probably a lot of, filling and pasting.
If you prefer to proceed clockwise as I do, your first panel will be anyname73, the next anyname63, etc. At this stage I still work in the original .jpg format, which will later be converted to .pcx. Select your key image, go Edit/Copy, click on the empty 1024 x 300 panel and paste it. You might do some resizing (Image/Resize) to make it fit the panel. But don’t go for a perfect fit, make it either a little smaller or larger than your panel. The reason is that you’re going to have to smooth the seams and that would be really hard if the seams were right on the edges of the panels. If you make it a bit (let’s say 20 - 30 pixels) smaller or larger, you will be able to smoothly join the next image either on the same or on the next panel.
One of my key images while making the horizon for Apple Isle was the picture of Mount Wellington that juts out over 3000’ above Hobart on Tasmania. During my week long stay in the area it was never quite clear of clouds, out of several snapshots I took I finally selected this one - here it is as it looked when pasted to the panel:
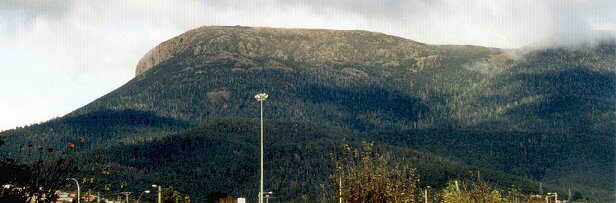
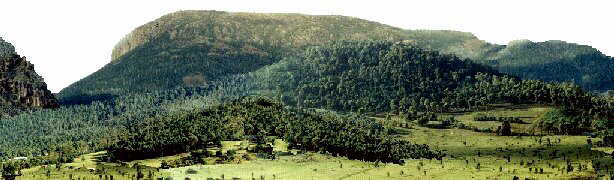
Note that the clouds partially obscure the secondary peak on the right, here is where you can use your artistic licence. In this case I decided to get rid of some of its higher areas and enlarging the image, I also pasted a few small strips with tree tops taken from another picture. The ugly looking street lamp naturally had to go, as well as the symptoms of civilisation that intruded into the bottom part of the image. I’ve cut some hills out of another picture taken in the same general area and pasted them over the offending parts. I had to get rid of the cloudy sky; for our purpose all the clouds in the sky have to be cleared and the area has to be filled with invisible paint (about that later). To do this the easiest way usually is to use the Magic Wand. In Tool Options pop up menu you use this setting: Fill Style: Solid Color - Blend mode: Normal - Paper texture: None - Match mode: RGB color - Opacity 100 - Tolerance: this is the key to success, with whitish clouds you usually need about 30 - 35, but you might need more. Play with it and make sure that the selection covers only the parts you want to be taken out. When you are satisfied, click Edit/Cut, making sure that the two selected colors the bottom one is white. You might later have to take some remnants of clouds out manually under enlargement, when you fine tune the horizon. After all the work the horizon panel looked like this:
Note that I have played a bit with the colors. This is one area that I cannot help you a lot with, even the scientific testing proves that we all perceive colors differently and individually. I could nevertheless give you some useful tips on where to look in the PSP features. Go to Colors/Adjust. The ones I use intensively are Red/Green/Blue and Brightness/Contrast. To a somewhat lesser degree Hue/Saturation/Lightness and Highlight/Midtone/Shadow. On our sample I took off some red and blue while adding a bit of green. I spend a lot of time making color and brightness adjustments and you’ll need to do that too. No two prints that come out of the lab are exactly the same, so you are forced to do some changes most of the time. The important thing while doing this is that you have plenty of memory to enable you to set the program preferences to undo and redo the changes. Go to File/Preferences/General Program Preferences/Undo. Enable both the undo and redo systems and either leave the Limit undo/redo box blank or set the limit pretty high, at say 30MB.
On the second image of Mt Wellington there are three distinct layers. The first is the distant mountain itself. The second is the forested hill in front of it. The third is another forest with ridges on either side, nearest to the front. My years of experience as a landscape artist and a teacher helped me here to build this picture on the basis of color perspective. You will note that the colors in front are the brightest, with the yellow and the light green predominant. The middle part is green with a slight bluish tint. The distant mountain is a little fuzzy, with the slightest touches of purplish color here and there. This purple is almost invisible, but it is there, I can assure you, and it helps to give the picture an extra feel of depth.

The same principle is applied on this image. I have made the two panels to the left of the previous one into one image and deliberately separated them. Note that the panel on the right that is closer to the observer uses more green/red/brown colors, but as we get farther away they gradually change into blue. The fundamental principle of color perspective is that the sequence of colors (while moving away from the observer) is: yellow, green, blue, purple. Red is a stimulant to be used only sparingly. BTW, the original photo from which the right panel was made looked like this:
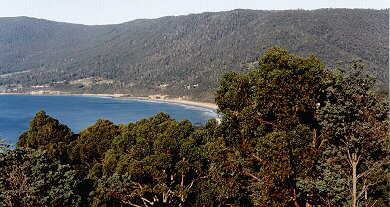
It is obvious that I had to tinker with the colors quite a bit to remove a lot of the red. Sometimes I do this only in selected parts of the panel making a selection with the freehand tool and changing the colors, brightness or contrast... You can do this only while you remain in 16 million colors, this is one of the reasons why I prefer to stay in this format at this stage.
Let’s move to a different subject. How do I achieve the almost seamless joints? I have developed the following method:
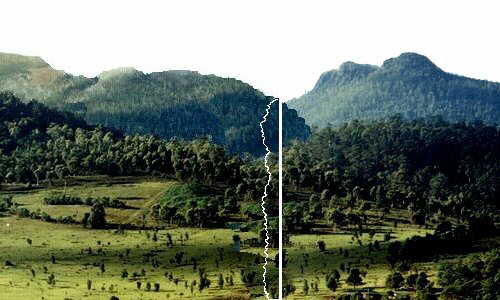
When I’m satisfied that all the major work on two adjoining panels is finished, I use the freehand tool to select a section on the edge of one of the panels, as marked in white above. I start right at the edge and finish at the edge, but move in a crooked way over the rest of the panel. I copy the selection and paste it to the other panel. I go Image/Mirror and with the mover tool I move the selection to the edge of this panel. You’ll find that it usually blends almost perfectly. Sometimes I might have to do a little smoothing or if it doesn’t look quite right in the final viewing from the designer, I might go back to the offending panels, enlarge them, select a contour of a tree or a rock from somewhere and paste them in the middle of the cut (ie. half of the tree or rock to the edge of one panel, the other half to the other panel). I might have to repeat this several times.
You have made seven 1024x300 panels in .jpg, you have joint them mutually, you have adjusted the colors so that they more or les match each other. Well, you are about half way there. Now the real work is about to begin. It might pay you to save all the files in case something goes wrong in the next stage. You now have to change to the .pcx format. Go to Colors/Decrease color depth, select 256 colors 24 bit. Go again to Colors/Edit palette. Your palettes appears, make sure that Start order box says Palette order. Double click the black in top left box on the palette, a color selection menu appears. Choose a color that’s unlike any other color on the palette. The one color that is most often used is the purple in the third box in the bottom row, the values red 128, green 0, blue 128. Click OK. Of course, you can choose any other color, but this purple is unlike any color that’s likely to appear in you picture, so it’s perfectly suited to the purpose. This purple has now become you invisible color, it will not be read by the program when the image is rendered, it will therefore show what is beneath it, in our case the sky. It also means that any single pixel or any area on the picture that previously was occupied by the blackest of black is going to become invisible and will show the part of the sky underneath it, when you move to the Designer. Prevention is the best cure, you don’t want your horizon to look like a sieve when it finally shows up. Go again to Edit palette, click the black (or near black) color in the box next to the purple. Click OK. The black will now appear as your top color selection, the purple will be below it. Go to Color replacer, in the pop up menu set Tolerance to 0. Double click on the Color replacer, any purple has now been replaced by the black. If it’s not black enough for you, edit the palette again and set the value of black to the blackest you want to see. You now have the perfect palette that is also transparent.
Phew! Time for a cup of coffee, Mack style. Or the Turkish coffee, my style.

Repeat the process with all 7 panels. You might be tempted to save the first transparent palette and simply load it to the next 6 images. Try to resist this temptation, my experience has taught me that it’s probably going to catch up with you somewhere along the line and result in a panel or two that would look discolored and that you’re going to lose all that time you thought you have saved and some more.
When all seven panels have been converted to 256 color 8 bit transparent palette, it’s time to resize them. First make sure that they are named properly, from left to right anyname73.pcx, anyname63.pcx... anyname13.pcx. Save them in your course folder, go to Image/Resize, select Pixel size, make sure that the two boxes near the bottom of the menu are both ticked. Set the width to 800 pixels, resize all the panels, name the first anyname72.pcx, anyname62.pcx, etc. Image/Resize, this time select 640 pixels and repeat the process, naming the panels anyname 71.pcx...anyname11.pcx. In your .ini file put a line under [HORIZONS] anyname11.pcx=horizon (or any comment you wish). You should now have a working horizon.
Do you think that you’ve finished? Probably not, unless you’re some kind of a genius. Load the Designer and look if it’s there under horizons at the bottom. If it’s not there, you’ve made a mistake somewhere. Check your .ini file. Is it correct? Check the images. Are they all in the proper format, 256 color 8 bit? Sometimes the horizon might show, but some panels are out of order. Make sure that all is right.
If all appears to be OK, select the horizon and have a good look at it. The best way is to use a flat, as yet undeveloped hole and look at it from all angles, noting any spots that you dislike, most probably near the joints. Go back to PSP and fix it. Try to stay in 256 colors, if you need to use some functions that are unavailable, first save the palette as a separate file for each panel, increase the colors to 16 million, sharpen the image or whatever, then reload the palette again. The most common problem appears to be an “aura” in the area where the distant trees meet the sky. You could use the colour replacer locally (with one click set to a certain brush size of say 30 pixels - never use it globally at this stage, it might do more harm than use, putting little holes everywhere. But the best cure is the safe one, doing it manually. Enlarge the image about 10x and move along the top, replacing the whitish or bluish squares with purple. It might take some time, but it is the safest and most effective way.
Go to bed, have a look at your new horizon the next day. I bet you that you’ll see more flaws you will want to fix. Don’t be lazy, do it. It could mean the difference between a top notch horizon and a mediocre one.
Good designing!
